Saturday, February 26, 2011

leather wrap bracelet...the girl version

It's been about a week since my last post and I've been eager to share my new bracelet with you, but I've been having camera troubles.  I'm happy to be writing again and even more excited I've finished another leather wrap bracelet, this time for myself.   As mentioned in my previous blog, the process is simple, and I find it quite relaxing so I started a bracelet last week sometime and I've just been working on it casually, while watching TV or waiting for my wash at the laundromat. I made a five wrap bracelet, which turned out to be about 3 feet long in total., so you can image it took some time.  It's brown distressed leather with aqua blue faceted glass beads and a sterling button for the closure.


I took this picture in the beginning of the bracelet, once I put the metal button and about 40 beads on.  You can see I'm using a very fine metal needle, two strands of leather, Czech glass beads, nylon thread, seen here on the small spool and beeswax to wax the thread together. 


This close up shows how the nylon tread secures the beads to the leather and how well the faceted glass beads catch and reflect light.


I really like how the finished product turned out.  I was hesitant to buy that sterling silver button at first because it was a little expensive and I had some older metal buttons in my supply kit, however I am really glad I chose to buy it because I think it's a great contrast against the brown leather and really accents the blue glass.  

Tomorrow I am having a few girlfriends over to teach them how to make these bracelets and watch the Oscar's, enjoy some delicious snacks and just hang out.  I plan on starting another bracelet, this one with the same brown distressed leather but using warm brown, tan and orange Czech glass beads.  


I can't wait to show you the finished product!


Wednesday, February 16, 2011

leather wrap bracelet...the man version

It's been a few days since I took the leather wrap bracelet class at Abeille in Brookline but I am still so very excited that I now know how to make them (and it's easy too).  The class was on Sunday from 12-2 and I took it with a girlfriend of mine and her roommate.  Since we were so close to Coolidge Corner we just had to have breakfast at one of my favorite spots, Zaftigs which is always delicious; however you must know if you go before noon they do not have their famous bagel chips with homemade cream cheese dip.  This simple, complementary starter may be the reason I make the trek from Somerville or maybe it's the homemade pickles, but either way, be prepared for no bagel chips if you go before noon (because I was unpleasantly surprised).  Just a little FYI.

It's so easy for me to get off track, especially when it comes to food, so let me get back to the bracelet. As I mentioned in my last post, I received a Chan Luu leather wrap bracelet made with brown leather and Hematite stones for Christmas last year and I wear it all the time, so I was excited when I saw I could take a class to learn how to make it. The process is simple.  I found it relaxing, however it is pretty time consuming if you're making a long bracelet. I decided to make a simple, single wrap bracelet as my first one because I knew I wanted to work on something in the class that I could finish quickly, but more importantly I wanted to make a manly version of the bracelet for my boyfriend for Valentine's Day (which happened to be the day after the class, so I didn't have a lot of time to finish).  I brought some beads with me I already had, antique silver tubes and some small round antique bronze nuggets which I combined with some new beads I bought during the class that are faceted brass.  I combined those with distressed brown leather and a metal button I had in my beading supplies for years that I finally found a use for.  I nearly finished the bracelet in the class and had only about an inch left to complete when I got home.  It made for a great gift! 


I also bought some teal/aqua blue glass beads to make a bracelet for myself as well as some tan, orange and rose colored glass beads for a third bracelet, both using distressed brown leather.  I plan on making the two other bracelets five-wraps which means they need to be approximately 36 inches long.  I think I might start working on one tonight and pick it up when I'm in the mood or while I'm watching TV and just complete it casually.   I'm thrilled I now know the process and can whip up beautiful, versatile and chic gifts my my family and friends.  I'll keep you posted on my progress with photos and updates.


Tuesday, February 8, 2011

mineral metallic pearl necklace

While working on my subway poster I was simultaneously working on a new piece of jewelry.  I bought two strands of very light olive/mint green fresh water pearls a while back and have had them stored with all of my beading supplies for quite some time, unsure of what I wanted to make.  A few weeks back I went bead shopping with a few of my crafty girlfriends to Abeille in Brookline Village and The Pear Tree in Coolidge Corner to look for some new beads, findings and inspiration. There is a bead store closer to my house, in Harvard Square, but they have a limited selection so I was excited to learn about some new shops to get supplies.  I was pleasantly surprised to find a wide variety of everything I was looking for and more.  The staff at Abeille was so friendly and helpful which is usually hard to come by at other bead supply stores.  I even signed up for a class that I'm taking this coming Sunday on how to make leather wrap bracelets.  Last Christmas I received a Chan Luu Leather Wrap Bracelet from my boyfriend and it is one of my favorite pieces of jewelry.  It's so versatile I can dress it up or down and it makes such a great gift.   I was thrilled to see that I could take a class to learn how to make it.

As far as the fresh water pearl necklace goes, I have made other pearl necklaces before, mostly traditional, simple simple strands of pearls.  For this necklace I wanted to combine the pearls with some other beads and materials to give it a more modern, casual look.  I think the natural color of the pearls also lend themselves to this more contemporary style.  I created two strands of pearls with a variety of other beads mixed into those strands consisting of clear glass round discs, frosted faceted green glass beads, antique bronze disc spacers and small antique bronze and silver tubes.  

In addition to the two strands of pearls, I also used two different sizes of antique bronze chain and one strand of a green metallic glass seed beads. I fastened them all together with a filigree bead cap and a loop hook clasp.


Then I twisted all of the strands together to make a larger, chunkier looking necklace.  I think the twisted strands give the necklace a versatile look that can dress up a T-shirt or dress down a little black dress.


I usually use sliver clasps and spacer beads but I'm starting to really love the antiqued look of the bronze, however it is much harder to find matching pieces.  I have some other beads in my supply kit that I am planning on using use soon, so I will try to incorporate the new antique bronze findings with those beads. 


Stay tuned for updates on new jewelry projects and my post about my leather wrap bracelet on Sunday.  I also have a photography project I can't wait to share with you.


Saturday, February 5, 2011

superbowl deliciousness

For those of you who are attending Superbowl parties tomorrow, I have a crowd pleaser for you.  When I entertain or bring a dish to a party, I usually like to share something that is "relatively" healthy (that excludes cheese of course... I always have to have cheese) or at least has some sort of sophistication.  However, completely forget both of these things if you want to bring the best appetizer to your Superbowl party, or any party for that matter.

I like to call this hot bubbly concoction Buffalo Chicken Wing Dip, and I know this is not a new concept (but neither is mac and cheese and people go nuts for it).  I have made this for almost every party I've had and have also brought it to past Superbowl parties as well.  The results are always the same...an empty dish with barely no trace of its one delicious contents.  The "recipe" is simple, and I tend to make it slightly different every time.

I will provide you with a list of ingredients, however, the quantities vary depending on how massive you make to make it.  I usually make a "double" and there's never a problem with it being finished.

The List
Skin-On, split chicken breasts, I usually buy a package of about 4
2 bottles of Buffalo chicken wing sauce, Texas Pete's and Frank's Buffalo are both good but I sometimes use a mixture of different brands, for more flavor variety
2 packages of cream cheese, I usually buy the reduced fat kind, because it doesn't really matter, and you might as well save some calories somewhere
1 package of shredded mozzarella and monterey jack/cheddar cheese (any mixture is good, but definitely get mozzarella)
1 bottle of blue cheese dressing

Tostitos scoops tortilla chips
Fritos scoops
Celery
Green onion

The Directions
Boil the chicken breasts until they are cooked all the way through.  Take them out of the water and let cool.  Once cool, remove the skin and bones, discard. Using a fork, break the chicken into small, shredded pieces.  Add the shredded chicken to a medium saucepan then add the buffalo wing sauce.  I like to let this mixture simmer for a little while, maybe 10 minutes just so the chicken absorbs all the buffalo flavor.  While that is cooking, spread the cream cheese (it's easier to spread if it's room temperature) into the bottom of a casserole dish into an even layer.  Once the chicken and sauce mixture has simmered for 10 minutes, remove from heat and add about half of the blue cheese dressing (this amount can vary depending on how creamy you want it).  Then add about a cup or so of shredded cheese.  Stir it all together so everything is well incorporated.  Pour the chicken mixture over the cream cheese in the casserole dish.  You can refrigerate this (covered with foil) until you are ready to serve it.  Before serving, sprinkle a little more shredded cheese on top, then heat in a 375 degree oven for about 15 minutes or until it is hot and bubbly.  Some people also like to top the dish with a drizzle of blue cheese, but since we added it into the mixture earlier, this step is not necessary.  Once removed from the oven, top with chopped green onion and serve with scoops chips and celery sticks.  Step back and watch your guests devour it.

As much as I hate football, I have to admit I love the Superbowl because it's a great excuse to get together with friends to drink beer and eat totally delicious junk food.  If you make this dish you're sure to be a crowd pleaser.  Enjoy!

Thursday, February 3, 2011

final stages

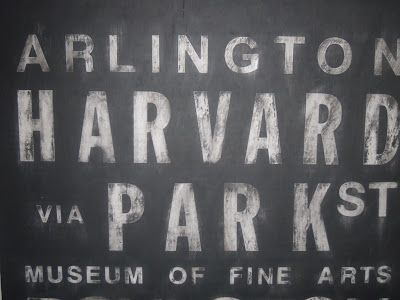
Here it is!  After many hours of prepping for the final finishing coat of black paint, I am excited to post these pictures.

My original plan was to remove the white vinyl stickers after painting it black, to revel the white painted plywood underneath, however after I painted it my plan changed.  I put on a thin first coat which included covering the letters, not intentionally, but just to ensure I covered every spot. As I continued to paint and cover over the letters I began really liking the look of the letters covered in black.  After putting on a second coat, the paint that was on the letters was beginning to dry, so I used a fairly dry brush to remove the excess paint.  It took a little muscle to remove most of the remaining dry paint, but after a while of doing that, I ended up with a grungy, weathered look that I was really pleased with.

I am and (probably always will be) curious to know how it would have looked if I peeled away the stickers and had the crisp white paint show through.  However, I did a quick test on the back before I started painting the top coat, and when I removed the letter there was a little bleeding under the lines, so I didn't want to risk the chance of not having crisp, clean letters.

I also had plans to add a few streaks of color, some dark blue and green, but I am afraid to add anything to it now, for fear of doing something I don't like, that's irreversible.  I am still considering adding black oil-based paint to give it a little more depth and texture, but I will probably do that some time this weekend.

 Check out the photos below for some close-ups as well as early stages of the painting process.

First coat, wet, letters covered

First coat, dry, letters lightly cleaned

First coat, dry, letters lightly cleaned, close-up

Second coat, dry, letters cleaned

Second coat, dry, letters cleaned, close-up

Final (unless I add black oil paint for texture), shown in room for perspective.  I plan on hanging it on this wall in between two windows, but until then it looks good resting on the floor too.

Now that this project is complete, it's time to work on something new.  I  just completed a fresh water pearl necklace that I want to post about, so stay tuned for pictures.


Tuesday, February 1, 2011

getting there

I put all of the stickers on the board tonight and I cannot wait to paint it black and pull off the stickers to see the final result!  It's almost done!

I would love to put the paint on tonight, but I'm getting tired and don't want to rush though and potentially screw it up (especially after all the prep work).  I'm planning on using a light and very dry covering of black acrylic paint and then incorporating a few subtle streaks of navy blue and forest green to add a little color.  I also want to add a little black oil-based paint to add extra contrast and texture.  My hope is to create a finished product that looks naturally aged and doesn't have that freshly painted look.

This pictures just shows the pile of leftover sticker backing that was peeled away after the tedious task of putting them all on the board. Hopefully all this work pays off...we'll see!