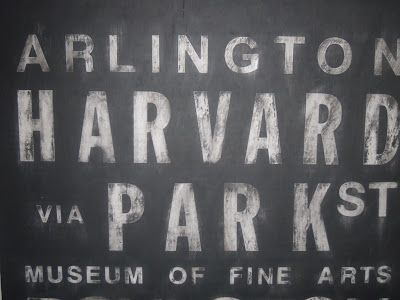
My original plan was to remove the white vinyl stickers after painting it black, to revel the white painted plywood underneath, however after I painted it my plan changed. I put on a thin first coat which included covering the letters, not intentionally, but just to ensure I covered every spot. As I continued to paint and cover over the letters I began really liking the look of the letters covered in black. After putting on a second coat, the paint that was on the letters was beginning to dry, so I used a fairly dry brush to remove the excess paint. It took a little muscle to remove most of the remaining dry paint, but after a while of doing that, I ended up with a grungy, weathered look that I was really pleased with.
I am and (probably always will be) curious to know how it would have looked if I peeled away the stickers and had the crisp white paint show through. However, I did a quick test on the back before I started painting the top coat, and when I removed the letter there was a little bleeding under the lines, so I didn't want to risk the chance of not having crisp, clean letters.
I also had plans to add a few streaks of color, some dark blue and green, but I am afraid to add anything to it now, for fear of doing something I don't like, that's irreversible. I am still considering adding black oil-based paint to give it a little more depth and texture, but I will probably do that some time this weekend.
Check out the photos below for some close-ups as well as early stages of the painting process.
First coat, wet, letters covered
First coat, dry, letters lightly cleaned
First coat, dry, letters lightly cleaned, close-up
Second coat, dry, letters cleaned
Second coat, dry, letters cleaned, close-up
Final (unless I add black oil paint for texture), shown in room for perspective. I plan on hanging it on this wall in between two windows, but until then it looks good resting on the floor too.
Now that this project is complete, it's time to work on something new. I just completed a fresh water pearl necklace that I want to post about, so stay tuned for pictures.


Wow looks awesome. Much better than the ones you saw online that inspired you. Nice job!
ReplyDeleteThanks Alastair! It turned out better than I had expected. Thanks again for your help with trimming the wood!
ReplyDeleteWOW!!!!! SO very cool, Jilli!! I've always loved your style and creativity!! Can't wait to see the necklace!!! Pearls are my faves!! Stay warm and above the snow drifts!!! yikkkkkes!! xxoo love, Mrs. Deb
ReplyDeleteThanks Mrs. Deb! I will have to make you something with pearls to wear!
ReplyDelete